Tuesday, March 13, 2012

Steps to Rename a Subscriber Database for SQL Server Transactional Replication


Problem

I have transactional replication configured in production. The business team has a requirement to rename the subscription database. Is it possible to rename the subscription database and ensure that transactional replication will continue to function as before. If so, how could we achieve this?

Solution

The Test
Let's first try renaming a subscription database in our test environment. This tip assumes transactional replication is already configured.
We can use this script to rename a subscription database.
USE master;
ALTER DATABASE Current_subscription_database_name
  Modify Name = New_subscription_database_name; 
Renaming the subscription database is quite straightforward using the above script. The rename will occur successfully and you won't encounter any error messages or warnings if your distribution agent is not running and if there are no other connections to this database.
However, once you start the distribution agent job you will encounter the below error message.  To view this screen using SQL Server Management Studio (SSMS), navigate to Replication and right click and select 'Launch Replication Monitor'. After this, go to your listed server and expand it. Click on your publication and on the right side pane under the 'All Subscriptions' tab, go to your subscription and double click on it. Once done, click on 'Distributor to Subscriber History' tab to view this screen.
Replication status as viewed on Replication Monitor
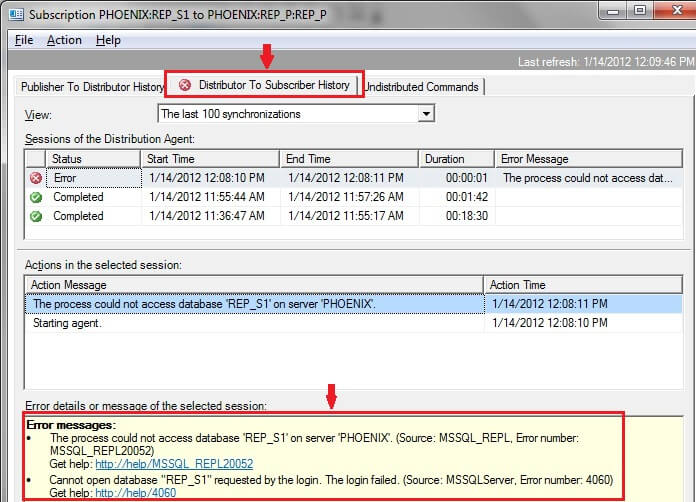
In this example, I had renamed the subscription database to REP_Subscriber from REP_S1.  In the error message, you will notice that the distribution agent job is failing because it is trying to connect using the old database name.
The process could not access database 'REP_S1' on server 'P'. (Source: MSSQL_REPL. Error Number: MSSQL_REPL20052)

Cannot open database "REP_S1" requested by the login. The login failed. (Source: MSSQLServer, Error Number: 4060)
You can also check the distribution agent job for more details. Using the 'Job Activity Monitor' in SSMS, we could go to the corresponding distribution agent job and view the second step of this job which is 'Run Agent' as shown below.
Details of Run Agent Step in Distribution Agent job
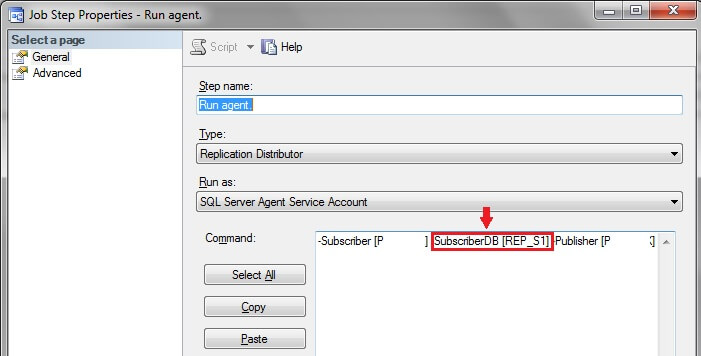
From this screenshot, it is evident that the distribution agent job is still trying to connect to the subscription database using its old name. Also, you can still find details of the old subscription database in replication system tables likesyssubscriptions (in publication database), MSsubscriptions (in distribution database) and MSdistribution_agents (in distribution database).
To fix this issue, we will cover two options for renaming the subscription database, so replication can still function.

Option 1 - Rename the subscription database, create a new subscription and delete the old subscription

From the above, it is evident that the distribution agent job will fail if we just change the subscription database name. So to rename the subscription database, we will need to follow the below steps.  This may seem like unnecessary work, but it is definitely the safest option.
1) Rename subscription database. (you could use the sample script above or use SSMS)
2) Create a new subscription for the renamed database and follow the steps in the wizard to setup replication.
Creating a new subscription
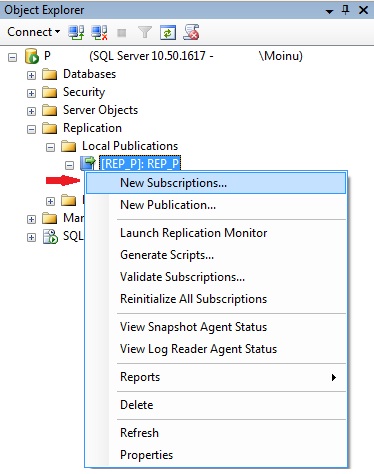
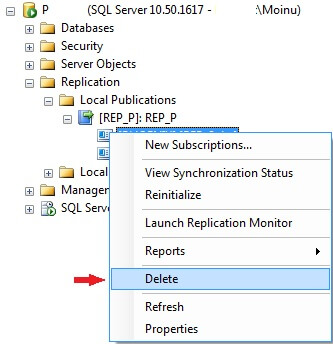
3) Delete the original subscription which referred to the old database name as there is no point in maintaining this subscription any longer.
Deleting the subscription which refers old subsriber DB  

Option 2 - Modifying Replication System Tables

CAVEAT: It is best not to change the replication system tables, but here is an option that works but be aware that this could cause issues if the user makes a mistake. If you are unsure or uncomfortable in changing system tables then you should follow Option 1.
Follow these steps:
1) Stop the distribution agent job for the subscription database. Also ensure there are no other connections to the subscription database otherwise you may get this error message while attempting to rename the database: "The database could not be exclusively locked to perform the operation"
2) Rename the subscription database
3) As discussed earlier, the old subscription database name is stored in certain replication system tables which require SQL updates. You would need to run these scripts:
Update syssubscriptions replication table in Publication database, use sample script
use publication_db_name
update syssubscriptions 
set dest_db = 'New_Subscription_db_name' where dest_db = 'Old_Subscription_db_name' 
Update MSsubscriptions replication table in distribution database, use sample script
use distribution
update MSsubscriptions
set subscriber_db = 'New_Subscription_db_name' where subscriber_db = 'Old_Subscription_db_name' 
Update MSdistribution_agents replication table in distribution database, use sample script
use distribution
update MSdistribution_agents 
set subscriber_db = 'New_Subscription_db_name' where subscriber_db = 'Old_Subscription_db_name' 
4) Go to the distribution agent job for this subscription using the job activity monitor and edit step 2 of the job to modify the SubscriberDB parameter to refer to the new subscription database. (Refer to the second screenshot in this tip).
5) Start the distribution agent job again
6) Insert some values into the replicated tables in the publication database and verify they are available in the subscription database.
7) Monitor replication status through the replication monitor

Following these steps will ensure that your transactional replication configuration continues to function after the subscription database name has been changed. The above steps were performed using SQL Server 2008 R2, but this should work for other versions of SQL Server as well.

Monday, March 12, 2012

Disaster Recovery: Rebuild system databases on SQL Server 2008 cluster


Introduction

Not long ago I was called at night by an operator because our company had experienced a power surge. As a result of this, all our SQL Servers rebooted. But upon reboot, one of our mission critical clustered SQL Server 2008 R2 instances failed to start automatically. Upon checking the error log, I noticed that following error appeared in the application error log:
During redoing of a logged operation in database 'master', an error occurred at log record ID (206:424:1). Typically, the specific failure is previously logged as an error in the Windows Event Log service. Restore the database from a full backup, or repair the database.
Cannot recover the master database. SQL Server is unable to run. Restore master from a full backup, repair it, or rebuild it. For more information about how to rebuild the master database, see SQL Server Books Online.
After doing a little more digging, I noticed that the file system of the drive that hosts the system databases files was corrupt. In order to meet the client's SLA I had to bring the SQL Server online within one hour. My first thought to recover system databases was to restore them from backups on backup drive, but unfortunately the backup drive was also corrupt as part of power failure.
I was left with two options: either restore the system databases from backups on tape or rebuild the system databases from the SQL Server 2008 installation media, which we have onsite. I quickly came to the conclusion that I had to rebuild the system databases. This was the most suitable solution for this situation because our tapes were stored on a DR site that is in a different city, and it would take at least 3 hours to get the tapes. Also by the time I finished rebuilding the databases, I would have my backup drive available because the maximum time for recovery for a backup drive is 1 hour.
In this article I will demonstrate you the steps I performed to rebuild all system databases (except resource database),and  then I will show you the steps I used to rebuild the resource database. In the end I will list the steps I performed to bring server back to the state before failure.

Step 1: Rebuild the system databases (except resource database)

The first step of the recovery process is to rebuild the following system databases i.e. master, model and msdb. I performed the following steps to rebuild master, model and msdb.
I first logged onto the active node and located SQL Server 2008 R2 installation media on the server. Using Cluster Administrator, I took all the SQL Server resources offline in the corresponding cluster application group. From a command prompt window, I used the following command to start the SQL Server setup to rebuild system databases:
Setup /QUIET /ACTION=REBUILDDATABASE /INSTANCENAME=InstanceName /SQLSYSADMINACCOUNTS=accounts [/SAPWD= StrongPassword ] [/SQLCOLLATION=CollationName]
The table below explains the parameters for the Setup program:
Parameter name
Description
/QUIET or /Q
Specifies that Setup run without any user interface.
/ACTION=REBUILDDATABASE
Specifies that Setup re-create the system databases.
/INSTANCENAME=InstanceName
Is the name of the instance of SQL Server. For the default instance, enter MSSQLSERVER.
/SQLSYSADMINACCOUNTS=accounts
Specifies the Windows groups or individual accounts to add to the sysadmin fixed server role.
[ /SAPWD=StrongPassword ]
Specifies the password for the SQL Server sa account. This parameter is required if the instance uses Mixed Authentication (SQL Server and Windows Authentication) mode. 
[ /SQLCOLLATION=CollationName ]
Specifies a new server-level collation. This parameter is optional. When not specified, the current collation of the server is used.
The command I executed to start the SQL Server setup is shown in the figure below:
When Setup has completed rebuilding the system databases, it returns to the command prompt with no messages as shown in the following figure:
I examined the Summary.txt log file as show in the following figure to verify that the process completed successfully:
This file is located at C:\Program Files\Microsoft SQL Server\100\Setup Bootstrap\Logs.

Step-2: Rebuild the Resource database

The second step of the recovery process is to rebuild the Resource system database. I performed the following steps to rebuild the resource system database:
I launched the SQL Server Setup program (setup.exe) from SQL Server 2008 R2 distribution media. In the left navigation area, I clicked Maintenance and then clicked Repair. The setup support rule and file routines ran to ensure that my server has prerequisites installed and my server passes setup validation rules. I clicked OK to continue. On the Select Instance page, I selected the instance to repair, and then clicked Next to continue. Now repair rules ran to validate the operation. I clicked Next to continue. From the Ready to Repair page, I seleted Repair option and then clicked Next to continue. The Complete page appeared that indicates the operation is finished successfully.

Step 3: Post-Rebuild Tasks

The last step of the recovery process is to bring the server to the state before failure. I performed the following steps to accomplish this task: 
After rebuilding the resource database I re-applied all service packs and hot fixes. I restored the master, msdb and model databases from the most recent backups. I bring the SQL Server instance resources online in Cluster Administrator.

Conclusion

In this article you have seen how I rebuilt system databases in a SQL Server 2008 cluster that failed to restart. You should rebuild system database only under conditions when you don’t have backups of system databases, system backups are corrupted or backups are not immidiately available. You will lose all your Linked Server, Logins, SQL Server Agent jobs when you rebuild system databases. To restore Linked Server, Logins, SQL Server Agent jobs either restore the master and msdb databases from most recent backups or recreate these objects by executing the scripts containing the definition of these objects. 
Source:

Thursday, March 8, 2012

How to use RunAs command for SSMS if option does not exist


Problem

As a best practice in the industry, a DBA often has two logins that are used to access SQL Server; one is their normal Windows login and the other is an admin level login account which has sysAdmin rights on the SQL Server boxes. In addition most of the time the SQL Server client tools are only installed on the local desktop and not on the SQL Server Production Box. In order to use the different login to connect to SQL Server using SSMS you need to use the "Run as" feature. What do you do in the case of Windows 7 or Windows Vista where you can’t find the Run As Different User option.

Solution

If the Run As different user option is not available while you right click on the SSMS executable or shortcut, you can follow one of the techniques below to use the run as option.

Technique 1 - Run As different User

Step 1: Press and Hold the Shift Key and Right Click on the SSMS executable or shortcut, you should see the Run as different user option in the context menu.
run as different user option
Step 2: Once you click on the Run as different user option the below dialog box will appear. You have to enter theUser Name or Domain\User Name and Password to run the application with that user's security context.
run as different user security credentials

Technique 2 - Run As different User using command prompt

Step 1: Go to the command prompt and type runas /? and you should see the Run As help as shown below.
runas command line utility

Step 2: Enter the below command in the command prompt to open SSMS with the different user's security context. It will prompt you for the password; enter the password to run the application.  Here I am entered "aa\jshah" for the domain\user to use.
c:\>runas /user:aa\jshah "C:\Program Files\Microsoft SQL Server\100\Tools\Binn
\VSShell\Common7\IDE\Ssms.exe"
After I run the above comand I am prompted for the password as shown below.
runas command line enter password prompt

Setup a Shorcut to do this

If you are going to use the secondary ID to always to connect to SQL Server, you can create a shortcut to open SSMS with the secondary ID context as shown below. 
Right click on the desktop, go to New and click Shortcut.
creating a shortcut for a runas command
Paste or type the above Run As command into the Target box. Then the next time you open SSMS just use this shortcut to use the Secondary ID.
shorcut properties for runas.exe command

Source:

Tuesday, March 6, 2012

Installing Windows Server 8 & SQL Server 2012


Microsoft recently released Windows Server "8" Beta for download. When you launch setup you'll be asked if you want to install Server Core or Server with a GUI:
 
While I will definitely be leaning toward Server Core for production, I chose the GUI installation for now just to feel my way around for a bit on a local VM. Also because it would be tough to demo all of SQL Server 2012's features from a Server Core VM.
Next during setup you will be asked if you want to upgrade or create a new installation. The upgrade is pre-selected, so be careful about pressing Enter here since - if you are installing on a VM - there is unlikely to be a pre-existing version of Windows on the VHD you just finished allocating:
 
From there installation itself was pretty simple, a lot like previous versions of Windows. The slowest part was "Expanding files" - I'm on SSD so I can't even imagine how slow this is going to seem for you platter folks. Just a little warning. Though I did experience a snafu when installing VMWare Tools (I run VMWare Fusion) - the VM froze up. I've also heard about some issues with the VMWare Tools for VMWare Workstation. So, depending on your virtualization platform, your mileage may vary.
Two things needed to be changed immediately. One was the resolution - the default is 1024 x 768 and this is horribly unusable. Once I was up to 1680x1050 (right-click the desktop and choose "Screen Resolution"), I wanted my Start Menu back. So I ran the following command provided in Mikael Nystrom's blog post (there is also a PowerShell version):
reg.exe add HKCU\Software\Microsoft\Windows\CurrentVersion\Explorer /v RPEnabled /d 0 /t REG_DWORD /f
Sadly, these tricks were written for the Consumer Preview, but they do not seem to work for server. If you've enbled the Start Menu on server, please let me know how you did it and I will update this post (and my VM).
One other thing I wanted to change was file extensions. I tried to create a .ps1 script on my desktop and it was actually called .ps1.text. This is one of those "let's cater to dummies" features that I've always hated, and lack of disciplined extensions is actually one of the things I like less about Mac OS. Anyway Windows Explorer now has a ribbon, and some of these settings are much easier to get to compared to the old Tools / Folder Options path:
 
Once Windows Server 8 was up and running (almost) the way I like, it was time to install SQL Server 2012 RC0. Remembering my trials with an earlier preview of Windows 8, and after reading Allan Hirt's blog post, I knew that I would have to manually install .NET Framework 3.5 in order to install SQL Server 2012. Allan outlines how to do this with the command line:
dism /online /enable-feature /featurename:NetFx3 /source:d:\sources\sxs\
I did this, and it reported success:
 
However, after restarting the system, when I went into the Server Roles and Features wizard, the .NET 3.5 feature was still not enabled. So I stepped through the wizard to add the feature, and rebooted again.


Once I rebooted, I validated that .NET 3.5 was correctly installed according to Server Manager. I went through the SQL Server setup and, once I had made all of my feature and other configuration selections, it took about 12 minutes to install SQL Server. When it was finished, it had placed a whole slew of tiles onto the Metro start page:
 
So, a lot of cleanup necessary here. But I have SQL Server, Management Studio and I can start to play:

Source:

SQL Server 2012 (Denali)


Microsoft SQL Server 2012 RC0 was recently released. RC stands for Release Candidate which is basically the version virtually production ready. Microsoft referred to this release as SQL Server Code Named "Denali" but has settled on SQL Server 2012 as the final name for the product.. Business intelligence (BI) is critically important to organizations both large and small. In the latest release of SQL Server, there is no shortage of BI enhancements in addition to many other enhancements. This article will give you a preview of the requirements, new features and enhancements in SQL Server 2012 (code named Denali) including:
  • Hardware and Software Requirements
  • Multi-Subnet Failover Clustering
  • Programming Enhancements, including sequences, ad-hoc query paging and full-text search tweaks
  • BI and Web Development Environment Improvements
  • Web-based Visualization
  • Data Quality Services
Keep in mind that this information is for preview only and is subject to change by Microsoft.

Hardware and Software Requirements

  • Microsoft recommends using NTFS file format instead of FAT32. FAT32 will work but you should probably not use it.
  • You can't install SQL Server 2012 (code-named Denali) on mapped drives or compressed drives.
  • You have to have the "no-reboot" package installed prior to installing SQL Server 2012(code-named Denali). This is included in Windows 7 SP1 and Windows Server 2008 R2. Otherwise, you can download the no-reboot package from Microsoft.
  • SQL Server 2012 (code-named Denali) requires the .NET Framework 4.0.
  • Virtualization is supported using Microsoft's Hyper-V technology.
  • You will need at least 3.6 GB of free disk space.
  • Microsoft recommends that you do not install SQL Server 2012 (code-named Denali) on a domain controller.
  • Recommended Processors & RAM
    • 64-bit version: AMD Opteron, AMD Athlin 64, Intel Xeon with Intel EM64T Support or Intel Pentium IV with EM64T support running 2.0 GHz or faster. Recommended RAM is maximum that operating system supports or at least 2 GB.
    • 32-bit version: Pentium III or compatible running at 2.0 GHz of faster. Recommended RAM is maximum that operating system supports or at least 2 GB.
  • Windows PowerShell 2.0 is a pre-requisite for installing SQL Server 2012 (code-named Denali). You can get this software from the Windows Management Framework page.
  • Check out the step by step installation guide with screenshots to get a preview of the SQL Server 2012 install and configuration process.

Multi-Subnet Failover Clustering

With SQL Server 2012 (code-named Denali), you can configure SQL Server where failover cluster nodes can be connected to a completely different subnet. The subnets can be spread out to different geographical locations providing disaster recovery along with high availability. In order for this to work correctly, you will need to replicate the data across the databases involved in this configuration. The SQL Server failover cluster is dependent on the Windows Server failover cluster so this has to be set up first. Keep in mind that all of the subnets involved in this configuration must be in the same Active Directory domain.

Programming Enhancements

  • Sequences: Sequences have been requested by the SQL Server community for years, and it's included in this release. Sequence is a user defined object that generates a sequence of a number. Here is an example using Sequence.
    /****** Create Sequence Object ******/
    CREATE SEQUENCE MySequence
    START WITH 1
    INCREMENT BY 1;
    /****** Create Temp Table ******/
    DECLARE @Person TABLE
    (
    ID int NOT NULL PRIMARY KEY,
    FullName nvarchar(100) NOT NULL
    );
    /****** Insert Some Data ******/
    INSERT @Person (ID, FullName)
    VALUES (NEXT VALUE FOR MySequence, 'Jim Johnson'),
    (NEXT VALUE FOR MySequence, 'Bob Thompson'),
    (NEXT VALUE FOR MySequence, 'Tim Perdue');
    /****** Show the Data ******/
    SELECT * FROM @Person;
    The results would look like this:
    ID FullName
    1 Jim Johnson
    2 Bob Thompson
    3 Tim Perdue
  • Ad-Hoc Query Paging: Paging results in SQL Server has been discussed for years. The Order By option in the SQL SELECT statement has been enhanced in SQL Server 2012. Using a combination of OFFSET and FETCH along with ORDER BY gives you control of paging through a result set. Using this technique can really help performance by bring back only the results you want to show to your users when they are needed. The following TSQL code runs against the Person table in the AdventureWorks sample database (available from Microsoft). In the sample query below, SQL Server would return 10 records beginning with record 11. The OFFSET command provides a starting point for the SELECT statement in terms of paging, and the FETCH command provides how many records to return at a time.
    SELECT BusinessEntityID, FirstName, LastName
    FROM Person.Person
    ORDER BY BusinessEntityID
    OFFSET 10 ROWS
    FETCH NEXT 10 ROWS ONLY;
  • Full Text Search: The Full Text Search in SQL Server 2012 has been enhanced by allowing you to search and index data stored in extended properties or metadata. Consider a PDF document that has "properties" filled in like Name, Type, Folder path, Size, Date Created, etc. In the newest release of SQL Server, this data could be indexes and searched along with the data in the document itself. The data does have to be exposed to work, but it's possible now.
BI and Web Development Environment Improvements
Microsoft moved BI (Business Intelligence) closer to the end user with SQL Server 2008 R2. The Excel PowerPivot tool help users by creating a self-service reporting model. To understand the impact of SQL Server 2008 R2, check out the About.com article Why SQL Server 2008 R2 Matters to Small Business. The good news is PowerPivot is being enhanced in SQL Server 2012 (code-named Denali). Microsoft is adding KPIs and drill through, which will be really useful for all users.
Analysis Services will include a new BI Semantic Model (BISM). BISM is a 3-layer model that includes:
  • Data Model
  • Business Logic
  • Data Access
BISM will enhance Microsoft's front end analysis experiencing including Excel, Reporting Services and SharePoint Insights. Microsoft has said that BISM is not a replacement for the current BI Models but more of an alternative model. In simple terms, BISM is a relation model that includes BI artifact such as KPIs and hierarchies.
Web Based Visualization - Project Crescent
Project Crescent is the Microsoft code name for the new reporting and visualization tool expected in SQL Server 2012 (code-named Denali). Project Crescent provides drag and drop ad-hoc reporting functionality and was built entirely on Silverlight. It includes a powerful query tool and interactive storyboarding to allow a user to share visualizations of large datasets.
Data Quality Services
Data Quality Services is a knowledge-based approach that runs in SSIS (SQL Services Integration Services). Data quality is one of those things that you never get perfect. Microsoft is introducing "Impact Analysis and Lineage" which will give you information about what your data depends on. It also shows the lineage of the data, including where it comes from and the systems that are behind it.
Source:

An Implementation of the FNV1a Hash Algorithm for SQL Server


Summary

This CLR code implements the Fowler-Noll-Vo (FNV) variant "1a" hash function. This algorithm provides exellent avalanche characteristics, low collision, and high dispersion across either string or integer inputs such as GUIDs, URLs, host names, file names, long text, IPv4 or v6 addresses, etc. My personal testing shows that the 64-bit version can successfully hash 10 billion 36-byte UNIQUEIDENTIFIER (GUID) values to 8-byte BIGINT (long) values with zero collisions. It is IMHO far, far, far better than the SQL native HASHBYTES, CHECKSUM-based hashing, etc.
You can read more about the FNV algorithm, its mathematical underpinning, and its variants here.
Three functions are provided:
xf_GetHash16
Hashes a VARCHAR or NVARCHAR string (up to 4000 characters) to a SMALLINT
OK collision avoidance
xf_GetHash32
Hashes a VARCHAR or NVARCHAR string (up to 4000 characters) to an INT
Better collision avoidance
xf_GetHash64
Hashes a VARCHAR or NVARCHAR string (up to 4000 characters) to a BIGINT
Best collision avoidance
Note that these are NOT encryption functions, they are hashing functions and have no equivalent "decryption" algorithm. One-way only!

Source Code

using System;
using System.Data;
using System.Data.SqlClient;
using System.Data.SqlTypes;
using Microsoft.SqlServer.Server;
using System.Text;

public partial class UserDefinedFunctions
{

    static readonly ulong prime64 = 1099511628211;
    static readonly ulong offset64 = 0xcbf29ce484222325;
    static readonly uint prime32 = 16777619;
    static readonly uint offset32 = 2166136261;

    [SqlFunction(IsDeterministic = true, IsPrecise = true, DataAccess = DataAccessKind.None)]
    public static SqlInt64 xf_GetHash64(SqlString value)
    {
        return (SqlInt64)HashFNV1a_64((string)value);
    }

    [SqlFunction(IsDeterministic = true, IsPrecise = true, DataAccess = DataAccessKind.None)]
    public static SqlInt32 xf_GetHash32(SqlString value)
    {
        return (SqlInt32)HashFNV1a_32((string)value);
    }

    [SqlFunction(IsDeterministic = true, IsPrecise = true, DataAccess = DataAccessKind.None)]
    public static SqlInt16 xf_GetHash16(SqlString value)
    {
        return (SqlInt16)HashFNV1a_16((string)value);
    }

    private static long HashFNV1a_64(string value)
    {
        ulong hash = offset64;

        byte[] bytes = Encoding.UTF8.GetBytes(value.ToLower());

        for (int i = 0; i < bytes.Length; i++)
        {
            hash = (hash ^ bytes[i]) * prime64;
        }
        return (long)(hash - long.MaxValue);

    }

    private static int HashFNV1a_32(string value)
    {
        uint hash = offset32;

        byte[] bytes = Encoding.UTF8.GetBytes(value.ToLower());

        for (int i = 0; i < bytes.Length; i++)
        {
            hash = (hash ^ bytes[i]) * prime32;
        }
        return (int)(hash - int.MaxValue);

    }

    private static short HashFNV1a_16(string value)
    {
        uint MASK_16 = (((uint)1 << 16) - 1);    /* i.e., (u_int32_t)0xffff */
        uint hash = offset32;

        byte[] bytes = Encoding.UTF8.GetBytes(value.ToLower());

        for (int i = 0; i < bytes.Length; i++)
        {
            hash = (hash ^ bytes[i]) * prime32;
        }

        hash = (hash >> 16) ^ (hash & MASK_16);

        return (short)(hash - short.MaxValue);

    }

};

Usage

Once installed, you can use these CLR functions like any TSQL function. Here is a proc that will return the 16-, 32-, and 64-bit hashes for a given passed string:
CREATE PROCEDURE GetHashes(@stringval NVARCHAR(4000))
AS BEGIN

DECLARE
   @smallhash SMALLINT, 
   @inthash INT,
   @bighash BIGINT

SELECT
   @smallhash=dbo.xf_GetHash16(@stringval),
   @inthash=dbo.xf_GetHash32(@stringval),
   @bighash=dbo.xf_GetHash64(@stringval)

SELECT
   @smallhash as Hash16Bit,
   @inthash as Hash32Bit,
   @bighash as Hash64Bit

END
Reference inline in a query:
SELECT dbo.xf_GetHash32(x.somecolumn) as HashValue
FROM mytable x
WHERE....
Or use in a computed column and optionally persist it for use as an index or even the primary key:
CREATE TABLE StringTable (
StringValue VARCHAR(512),
HashKey AS (dbo.xf_GetHash64(StringValue)) PERSISTED,
CONSTRAINT PK_StringTable PRIMARY KEY CLUSTERED (HashKey),
CONSTRAINT UK_StringTable_StringValue UNIQUE (StringValue)
)

Disclaimer

The source code is provided to you as is, without warranty. There is no warranty for the program, expressed or implied, including, but not limited to, the implied warranties of merchantability and fitness for a particular purpose and non infringement of third party rights. The entire risk as to the quality and performance of the program is with you. Should the program prove defective, you assume the cost of all necessary servicing, repair and correction.

Source: