Wednesday, February 29, 2012

Introduction to Utility Control Points in SQL Server 2008 R2


Problem

I'm looking at the new features in SQL Server 2008 R2 and I see one called a Utility Control Point. Can you provide an overview of this feature? Does this only work with SQL Server 2008 R2? Check out this tip to answer these questions and see how to use this new feature in your SQL Server environment.

Solution

SQL Server 2008 R2 has a set of new features called Application and Multi-Server Management that focus on reducing the complexity of managing databases and applications. The Utility Control Point is one of these features. At a high level the Utility Control Point provides a dashboard view of the overall health and resource utilization of the SQL Server instances and Data-tier applications in your organization. The dashboard is available from the Utility Explorer in SQL Server Management Studio 2008 R2 and is shown below:
SQL Server 2008 R2 has a set of new features called Application and Multi-Server Management
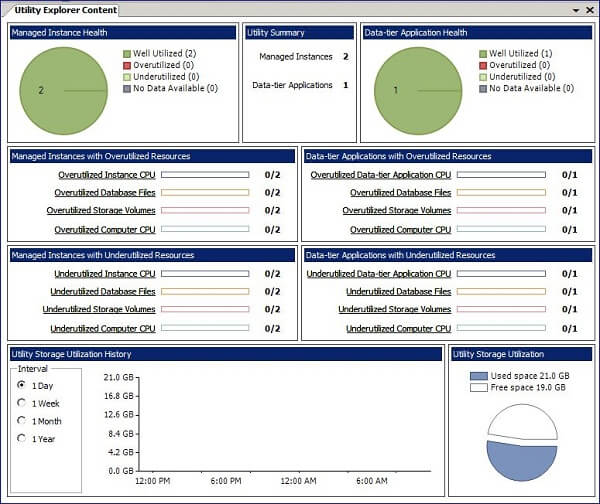
The following are the main points about the dashboard:
  • SQL Server instances and Data-tier applications are classified as well utilized, over utilized or under utilized
  • Resources reported on are per SQL Server instance: CPU usage, database files, storage volumes, and server CPU usage
  • Storage utilization history can be shown over a day, week, month or year
  • The criteria for determining whether a resource is well utilized, over utilized or underutilized are configurable via policies in the Utility Explorer
  • The dashboard is populated from data collected by SQL Agent jobs which are added when you create the Utility Control Point
  • You have to enroll each SQL Server instance in order to collect its data and include it on the dashboard; SQL Agent jobs are added to the instance to collect data and forward it to the Utility Control Point
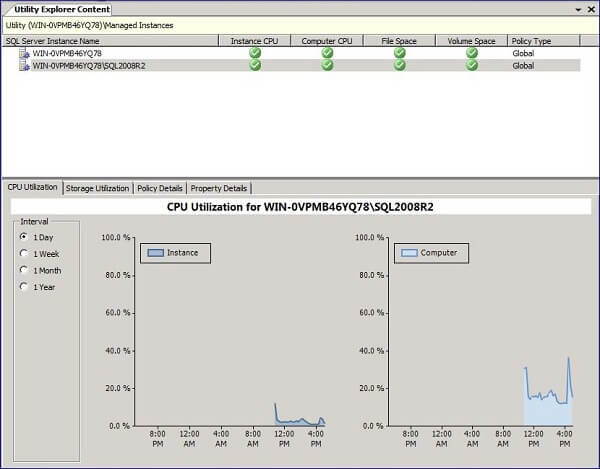
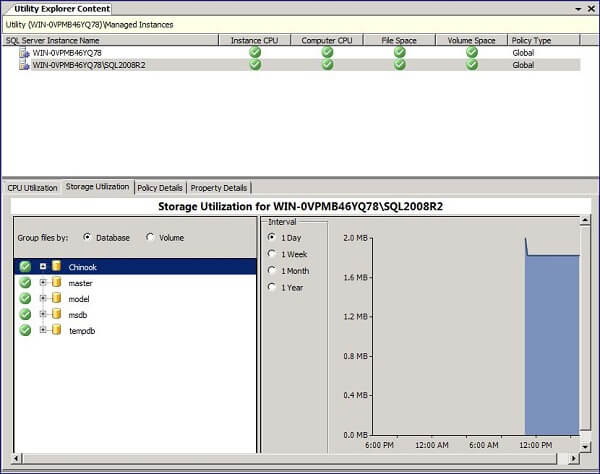
The Utility Explorer also provides a dashboard view for a single SQL Server instance that includes CPU and storage utilization as shown below:
The Utility Explorer also provides a dashboard view for a single SQL Server instance
Resources reported on are per SQL Server instance: CPU usage, database files, storage volumes, and server CPU usage
In this tip I will cover the following steps involved in setting up the Utility Control Point:
  • General Requirements
  • Creating a Utility Control Point
  • Enrolling a SQL Server instance in a Utility Control Point
  • Configuring policies in the Utility Explorer
I covered Data-tier applications in the tip Introduction to Data-Tier Applications in SQL Server 2008 R2. When you enroll a SQL Server instance in the Utility Control Point, its Data-tier applications are automatically enrolled as well.

General Requirements

The most important requirement is that the Utility Control Point is only available with SQL Server 2008 R2 instances; i.e. the Utility Control Point itself and every SQL Server instance that is enrolled must be SQL Server 2008 R2. The Utility Explorer (which displays the dashboard and includes the policy configuration) is only available in the version of SQL Server Management Studio that comes with SQL Server 2008 R2. Only the Database Engine is monitored in this initial release. FILESTREAM data is not monitored.
Additional requirements include:
  • All SQL Server instances must be in a single domain or you must have 2 way trusts
  • The server configuration Agent XPs (SQL Server Agent Extended Stored Procedures) must be enabled; you can use sp_configure to turn on Agent XPs; for more information see Agent XPs option in Books on Line. When you specify SQL Agent to start automatically during installation this will be done automatically.
  • SQL Agent should be set to start automatically
  • The SQL Agent service account must have read permission on Active Directory users
  • The SQL Agent service account must be a member of the local group Performance Monitor User
  • The edition of SQL Server for a Utility Control Point must be Data Center or Enterprise
  • Each enrolled instance will accumulate as much as 2GB of data per year
  • The MSDB database will use about 20MB of storage for each enrolled instance

Creating a Utility Control Point

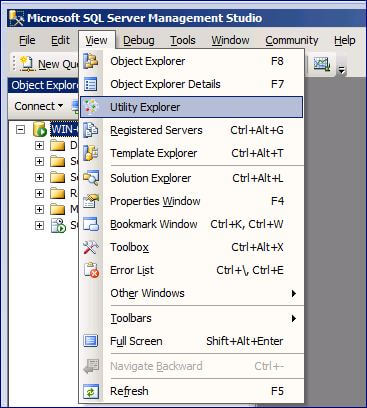
Open SQL Server Management Studio 2008 R2, click the View menu then select Utility Explorer from the context menu as shown below:
Open SQL Server Management Studio 2008 R2
The Utility Configuration Steps are displayed as shown below:
The Utility Configuration Steps
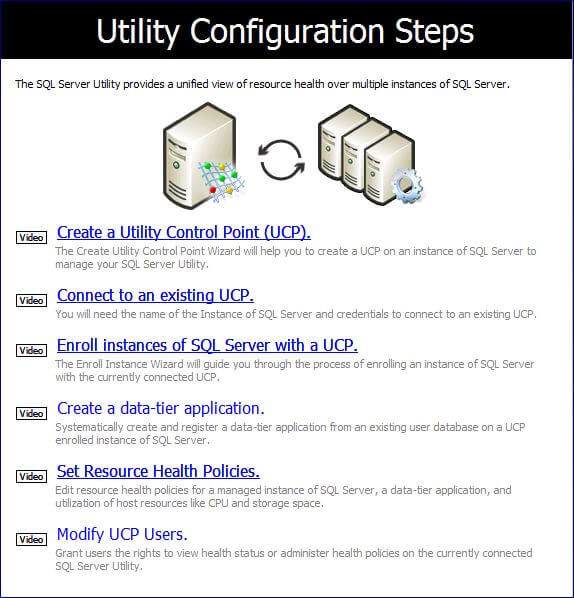
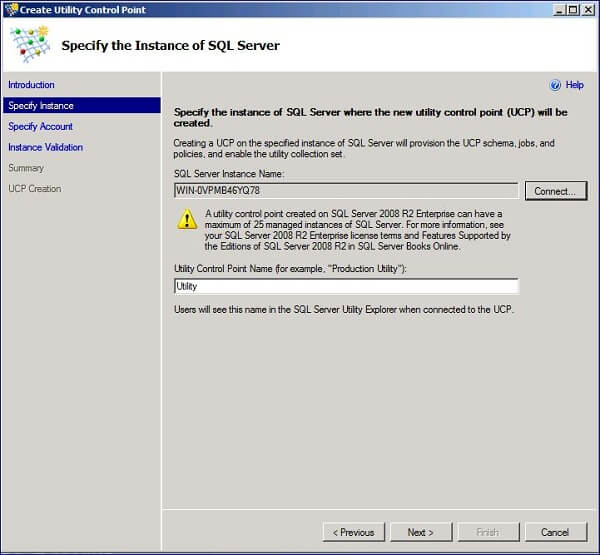
Click Create a Utility Control Point (UCP); you will be guided through a wizard to perform the operation. You will need to specify an instance of SQL Server 2008 R2 that will contain the Utility Control Point and a name for the UCP:
specify an instance of SQL Server 2008 R2 that will contain the Utility Control Point and a name for the UCP
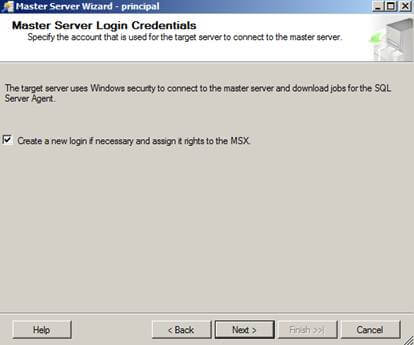
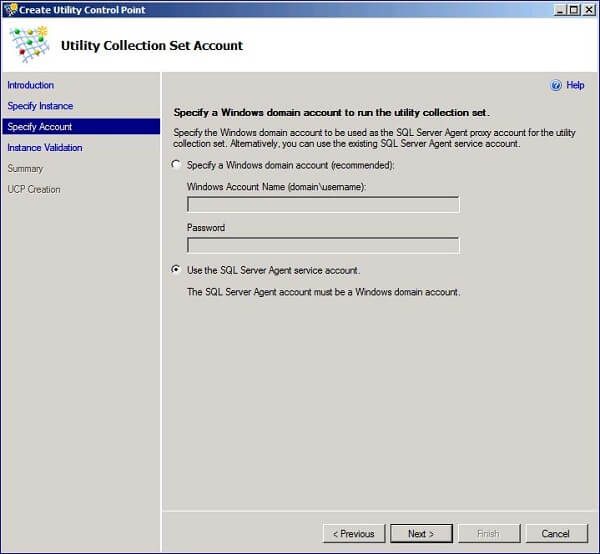
Next you need to specify a Windows domain account to perform the data collection; you can specify an account or use the SQL Server Agent account as shown below:
 you can specify an account or use the SQL Server Agent account as shown
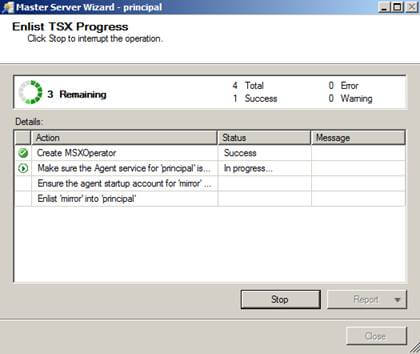
After completing the above steps in the wizard, the validation step is performed as shown below:
 the validation step is performed
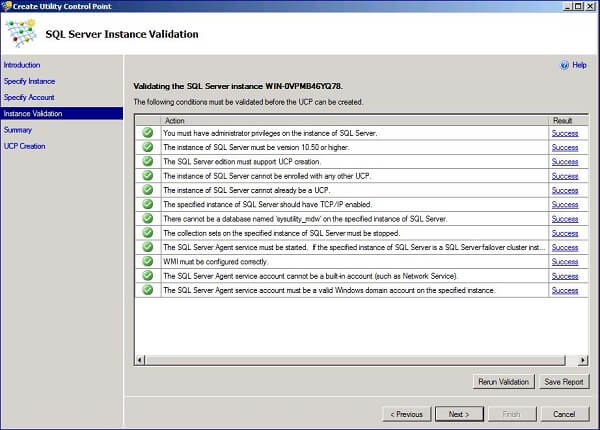
The validation step performs a number of checks to make sure that your SQL Server instance meets the requirements for creating the UCP. You will have to correct anything where the "Result" column isn't "Success" (there may be some warnings that you can ignore). As you can see there are quite a few requirements; one that I had to correct was to add the SQL Agent service account to the local group Performance Monitor Users.
The wizard will create a database named sysutility_mdw to hold the data collected from your SQL Server instances. In addition the following SQL Agent jobs will be created to perform the data collection:
the following SQL Agent jobs will be created to perform the data collection
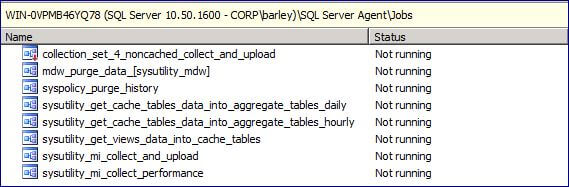
Please refer to Managing the SQL Server Utility in Books on Line for details on the configuration options available for the sysutility_mdw database and the SQL Agent jobs.

Enrolling a SQL Server Instance

A SQL Server instance must be enrolled with the Utility Control Point in order to collect its data and include it on the dashboard. You can enroll instances using the Utility Explorer in SQL Server Management Studio. Click on Enroll Instances of SQL Server with a UCP (see Utility Configuration Steps in the previous section). A wizard is displayed to guide you through the steps.
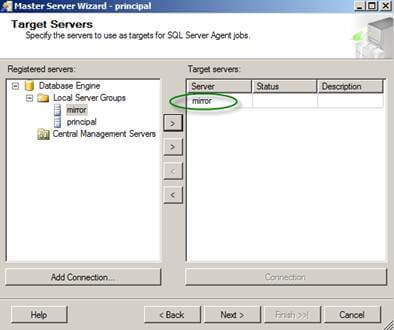
The first step is to identify the SQL Server instance to enroll in the UCP:
identify the SQL Server instance to enroll in the UCP
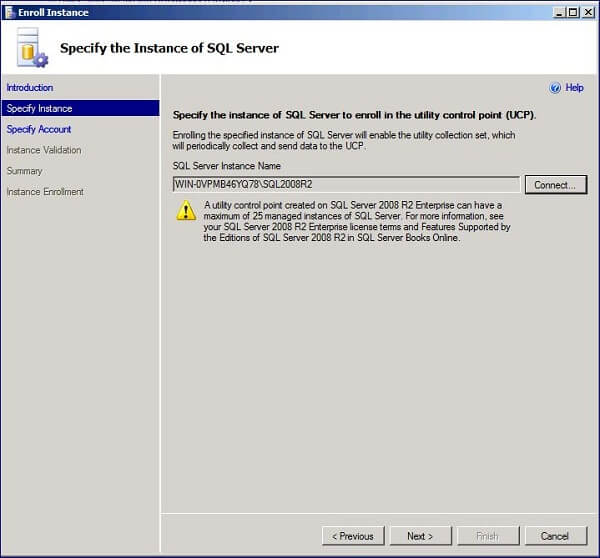
Note that you can only enroll an instance in one UCP and that a UCP can have a maximum of 25 enrolled instances.
The second step is the same as when you created the UCP; you have to specify the account to use for data collection (you can specify the SQL Agent service account).
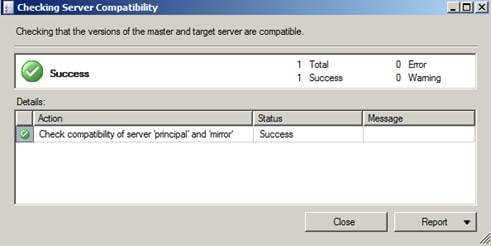
The last step in the wizard is to perform a validation to make sure all of the requirements for enrollment are met:
 perform a validation to make sure all of the requirements for enrollment are met
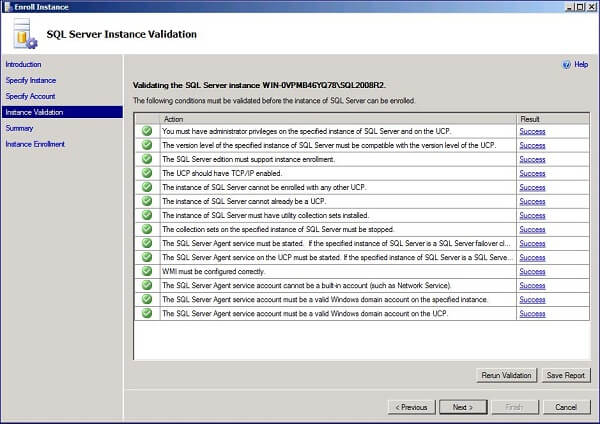
Just like with creating the UCP, there are a number of requirements and the "Result" column must be "Success" in order to continue (there are warnings that you may be able to ignore).

Configuring Policies

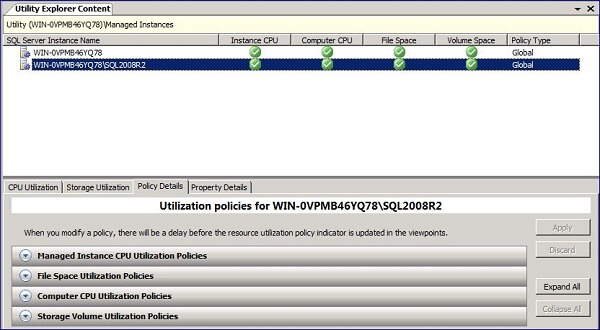
The classifications of well utilized, under utilized and over utilized (as shown in the Utility Explorer dashboard) are determined based on global policies and instance-specific policies that you can configure. Click on Utility Administration in the Utility Explorer to view and edit the policy. The global policies for managed instances are shown below:
Click on Utility Administration in the Utility Explorer to view and edit the policy
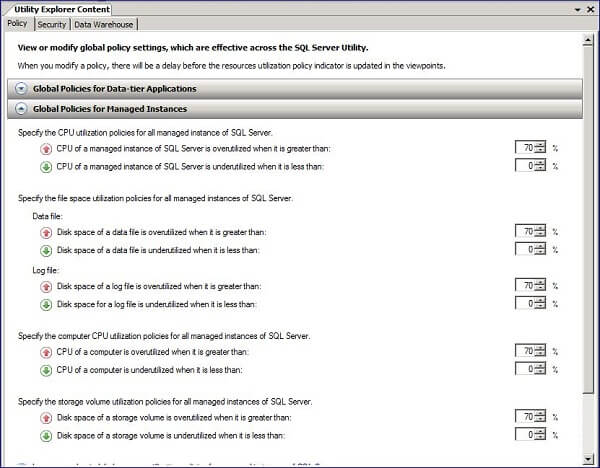
You can change the global policies to suit your needs and you can also specify policies at the instance level. Click on Managed Instances in the Utility Explorer, select a SQL Server instance, then click the Policy Details tab to view and edit the policies for a particular instance as shown below:
 select a SQL Server instance, then click the Policy Details tab

How to configure a UCP on Window 7 without a domain account


The SQL Server R2 documentation focuses on the SQL Server Agent account as must being a domain account.  However, a "stand alone" UCP can be setup on Window 7 without a domain account.  Of course, the UCP will only function for local SQL Server instances but this is sufficient for a learning/test environment.
The snag is when the SQL Server Agent service account is specified in the UCP setup wizard.  On a local box, the SQL Server Agent service account is stored in the form ".\ServiceAccount" vice "HostName\ServiceAccount".  This will return as error like this:
The SQL Server Agent service account must be a valid Windows domain account on the specified instance. Validation failed. The operation failed to create a login on the specified instance of SQL Server.  Possible reasons include invalid username and password, no permission to create a login, or a policy on the specified instance of SQL Server that prevents login creation. To continue, verify that the specified username and password are correct, then verify that Windows permissions and SQL Server PBM policies allow the specified account to run the Windows CREATE LOGIN operation. The error reported for this operation was:
Windows NT user or group '.\SQLServiceAccount' not found. Check the name again.
For more information, see the Help topic for this operation.
The workaround is to use the option to manually specify an account.  My preference is to use the SQL Server Agent service account for everything.  By manually specifying the account, it can be input in the correct form, e.g. "HostName\ServiceAccount".

Tuesday, February 28, 2012

SQL Server Multi Server Administration


Problem

I have multiple SQL Servers that need the exact same SQL Server Agent Job created. I know I can script a SQL Server Agent Job out and run the T-SQL script on multiple servers or bounce from server to server creating the SQL Server Agent Jobs, but isn't there an easier way? Check out this tip to learn more.

Solution

I seem to notice a lot of people do not use or even know about Multi Server Administration for their SQL Server Agent Jobs and Maintenance Plans. Multi Server Administration can be really useful when you need to create and run the same jobs or maintenance plans across numerous SQL Server instances. Let's walk through setting up Multi Server Administration for SQL Server.
Here’s a basic look at how to setup Multi Server Administration. My environment has two separate VM's running in VM Workstation with Windows 2008 R2 Datacenter Edition and SQL Server 2008 R2 Enterprise named Principal and Mirror.
First thing I’m going to do is register both servers in SQL Server Management Studio (SSMS). If you do not see the Registered Servers tab in SSMS navigate to 'View' | 'Registered Servers' or press 'Ctrl + Alt + G'.
RegisteredServers tab in ssms
Once both servers are registered I can start configuring Multi Server Administration. To do this right click on 'SQL Server Agent' on your master server and choose 'Multi Server Administration' | 'Make this a Master…' to begin the process.
sql server agent
Click Next on the Welcome for the Master Server Wizard.
The next screen is where we can configure an operator. Just like when we create an operator for local jobs, we can create one for our Multi Server jobs. You can also leave this section blank if you prefer not to have an operator although I would not recommended this practice. Once completed, press the 'Next' button to continue.
master server wizard
On the Target Servers screen is where we specify our target servers. You can have multiple targets, but for this example I’m only using one. You can select target servers using your 'Registered Servers' from your SSMS session or you can add a connection by clicking the 'Add Connection...' button. I’m going to select Mirror as my target and click the 'Next' button to continue the process.
target servers using registered servers from your ssms session
Next, SQL Server will check that the versions of the master and target server are compatible as shown on the screen shot below.
sql server will check that the versions of the master and target servers are compatible
On the Master Server Login Credentials screen security is checked between the master and target servers. If needed, the check box can be selected to create a login and assign it rights to the master server. Click the 'Next' button to continue the process.
master server login credentials
Once you click the 'Finish' button on the Complete the Wizard screen it will start the configuring the servers.
enlist tsx progress
Be aware that a common problem exists during configuration and the following error (The enlist operation failed (reason: SQLServerAgent Error: The target server cannot establish an encrypted connection to the master server 'Server Name'. Make sure that the MsxEncryptChannelOptions registry subkey is set correctly on the target server.) (Microsoft SQL Server Error: 22026)) may be thrown as shown on the screen shot below:
microsoft sql server error 22026
As the error indicates, we need to make a registry change on the target server. To accomplish this, logon to the target server and navigate to 'Start' | 'Run' | type 'Regedit'. As a best practice, be sure to backup your registry before making changes. From the Registry Editor browse to 'HKLM\SOFTWARE\Microsoft\Microsoft SQL Server\\SQLServerAgent and change the MsxEncryptChannelOptions' value to '0'. Save the change and close the Registry editor.
microsoft sql server\\sql server agent
Once this is complete, run the wizard from the master server again and it should finish successfully as shown below.
run the wizard from the master server again
To verify everything was configured correctly, connect to both servers and beside SQL Server Agent it should have either '(MSX)' or 'TSX:' as shown below.
beside sql server agent it should have (msx) or tsx
To set up a Multi Server Job under SQL Server Agent you must connect to the master server in SSMS and navigate to 'SQL Server Agent' | 'Jobs' | 'Multi-Server Jobs". Configure the job as needed and on the 'Targets tab' select the target servers you want this job to execute on.
in ssms navigate to sql server agent/jobs
Once finished, click the 'OK' button to save job to both servers.
save job to both servers
The same general process applies to Maintenance Plans, connect to the master server and navigate to 'Management' | 'Maintenance Plans' | right click and choose 'New Maintenance Plan…'. This process starts by naming the job as shown below.
connect to ssms and navigate to management/maintenance plans
Configure the Maintenance Plan as needed and on the Servers button select the servers you want this Maintenance Plan to execute on.
select servers you want maitenance plan to execute on
Once finished, click 'Save and Close' to save both Maintenance Plans to both servers as shown below.
save both plans to both servers

Sources:

SQL Server 2008 R2 Multi-server Administration – A First Look


One of the most useful new features of SQL 2008 R2 for DBA’s is the ability to manage and administer multiple instances of SQL Server from a central location using the new SQL Server Utility tool.

SQL Server Utility provides a unified view of the managed instances of SQL Server providing details such as CPU utilization, database file space utilization and volume space utilization by each managed instance. It provides a Utility Control Point (UCP) as a central repository for configuration and management of performance data collected for managed instances, and a Utility Explorer as a dashboard to view detailed and summary reports of the utilization, resource health and configuration information of all instances enrolled in the SQL Server Utility.
To setup the SQL Server Utility you need to:
(1) Create a UCP from the SQL Server Utility.
(2) Enroll instances of SQL Server with the UCP.
(3) Define Global and Instance level policies, and manage and monitor the instances.
To create a UCP, start by launching the SQL Server Utility and then select View > Utility Explorer in SQL Server Management Studio (SSMS). This will launch the getting started page:
The first option on this page is Create a Utility Control Point (UCP). Clicking this will launch the first screen of the UCP wizard as shown below.
This wizard will take you through a series of 5 steps to  create and set up the UCP.  Click Next to begin and you will be prompted to specify the name for the UCP, and select the SQL Server Instance to act as the UCP.
Next, you will need to specify the SQL Server proxy account for the data collection set as shown below:
                                                                                             
Next, the Instance Validation screen that will show the progress and results of the validation conditions for an instance.  
Next, the wizard will confirm the settings to be applied upon installation:
Finally, click Finish to close the wizard.
Since the UCP itself becomes a managed instance automatically, once the wizard closes  you will be directed to the Utility Explorer Content page displaying a graphical view of the various parameters like CPU utilization, database file space utilization and volume space utilization that are measured for the UCP instance.
Once you have created the UCP, you can start enrolling instances of SQL Server you wish to monitor and manage. This is done in the Enroll Instance Wizard, launch it by expanding the Utility Explorer tree, right-clicking on Managed Instances and selecting Enroll Instance. You will see the Introduction screen (as in the below two screenshots)
                                           
This wizard is also a series of five steps that will collect information regarding the SQL Server instance to be enrolled and register it with the UCP. On the first screen (below) click Next to proceed with the wizard.
 Next, as in the UCP wizard, click on the Connect button to bring up the Connect to Server dialog box (see below) where you select the Instance to be added, and then click Next to proceed.
Next, either specify a Windows Domain Account or a SQL Server Agent service account for the utility collection set. Microsoft recommends using a Windows domain account. Even if a SQL Server Agent account must be used, it should not be a built-in account such as LocalService, NetworkService or LocalSystem, but a windows domain account. Click Next to continue (see below)
The Instance Validation screen (see below) shown above is similar to the one you see in the UCP creation wizard. Click Next to proceed after confirming all Action Results are a Success.
The Summary shows the settings of the SQL Server Instance to be added. When you click Next, you will come to the final step of the wizard – Enrollment of SQL Server, showing the status of actions taken to enroll the instance in the UCP. Once you confirm the Success of  all actions, click Finish to close the wizard (see below two screenshots)
In the Utility Explorer Content page, there are several sections showing a graphical representation of the resources utilization. The Utility Summary box shows how many instances are managed. The Managed Instance Health and Data-tier Application Health indicates the overall health of instances. The Managed Instance with Overutilized Resources shows how many instances have overutilized the available resources. Likewise, the Managed Instance with Underutilized Resources shows how many instances are underutilizing the available resources. A similar explanation holds for the Data-tier Application boxes on the right. The two boxes in the bottom shows the utilization history of the utility control point managed instance.
A breakdown of utilization of each resource by individual managed instances is also available. In the Utility Explorer page, you click on the Managed Instances node, and on the right-hand side, in the Utility Explorer Content Page select the individual instances and look through the utilization of each resource in detail.